Furniture Design

Design Brief
This project involved designing and manufacturing a product from start to finish, with the goal of developing both practical making skills and a deeper understanding of the production process. I chose to design and build a bedside table, allowing me to explore both functional furniture design and detailed manufacturing documentation.
The brief required the design to include precise specification drawings, alongside accurate part and cut sheets, in order to be approved for production. This emphasised the importance of accuracy, clear communication, and attention to detail throughout every stage of the project.
Beginning with initial sketches, I was able to develop and refine the concept before translating it into CAD using Fusion 360. From there, I produced the full set of technical drawings and documentation required for manufacturing. This process strengthened my understanding of design for production, material planning, and technical drafting, while also improving my ability to communicate a design clearly through professional documentation.
Development

These CAD drawings showcase a range of technical sketches developed to communicate the design clearly and professionally. The drawings include exploded views, isometric views, and cross-section views, reflecting the types of documentation typically provided to a manufacturer during the production process.
Through creating these drawings, I gained a stronger understanding of the level of detail and clarity required for a manufacturer to accurately interpret and produce a design. The project highlighted the importance of technical communication, precise dimensioning, and organised documentation within the manufacturing workflow.
Although the final design evolved slightly throughout the process, the drawings remained highly beneficial in guiding the manufacturing stage and resolving assembly considerations before production. Developing these technical representations strengthened both my CAD drafting abilities and my understanding of how design information is translated into real-world fabrication.


Production
The manufacturing process was quite intense and not like anything I had done prior. I had to utilise a lot of new tools, machines and processes that I wasn't familiar with.
The first task was to create a scale model of the design to ensure it was achievable and to determine the necessary tools and processes. In this case I used MDF wood and a table saw to cut the pieces into shape. Seeing as my design had different angles I had to make sure that the cuts were precise and the piece would fit together. This proved tricky but some trusty old maths and trial and error came in handy.
Moving on from this model I could take what I learned and apply it to the real thing. Using both my model experience and my technical drawings I could get my pieces cut to shape at the appropriate angle.


This is where a lot of new skills were learned. It was easy enough to cut the pieces to specification but now I had to join them, create the draw, install the draw and finish the design. Wood joinery is a fascinating art and one tool that made my life a lot easier was the biscuit tool. It allowed me to perfectly cut and join my pieces at an angle without using screws or any other method that might be seen creating a seamless edge. It was a really fun tool to use. Gluing the whole thing together was quite tedious though because of the angles but I managed to get it done.


The draw was made of plywood and was fairly simple. Just a box cut to shape and glued/nailed together. The rail was bought from Bunnings and installed. The only tricky part was ensuring the tolerance of the rail between the walls and the drawer.


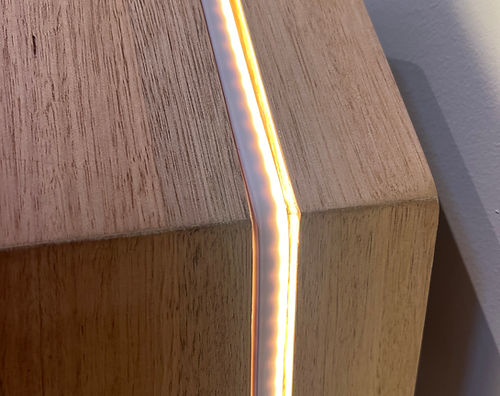
The key design feature of this product was the inbuilt lighting strip. I had a channel routed out and purchased an led light strip to install so the bedside table would act as a light as well. Below are some final images of the piece.


